Good cup, bad cup
Yogurt maker turns to vision system to eliminate leakers, dented cups
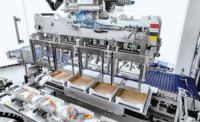
The ThermoChecker inspects the surface of 600 cups per minute, every 3 degrees, within 30 milliseconds.

Industrial Control has developed a new system to detect “leakers” or dents in cups during the printing stage. The ThermoChecker inspection system uses a 3D vision camera to monitor the surface for small defects which can affect the seal, resulting in spoiled product.


A screen shot offers the view from the 3D camera measuring the radius of the rim for defects.

The ThermoChecker from Industrial Control inspects the surface of 600 cups per minute, every 3 degrees, within 30 milliseconds.


Prepared and submitted by Industrial Control
Yogurt makers and other dairy processors using thermoformed cups know that leakers or dents in cups can halt production, creating waste and expense.
Industrial Control Inc., Zeeland, Mich., has developed an adaptable, high-speed 3D vision system to detect defective parts in existing systems in the thermoforming industry. Its ThermoChecker inspection system uses a 3D vision camera to monitor the surface for small defects which can affect the seal, resulting in spoiled product.
A large yogurt manufacturer discovered our solution and encouraged their supplier base to implement the ThermoChecker on their printing lines. Since last fall, 11 systems are installed at five production facilities between three different customers in the United States and Canada.
The ThermoChecker inspects the surface of 600 cups per minute, every 3 degrees, within 30 milliseconds. That’s almost 120 inspections per cup and 800,000 cups per day on each machine.
The ThermoChecker is installed just past the curing light in the print machine and is not affected by the intense light. Industrial Control’s high-speed PLC and computer instruct a dairy processor’s existing machine and reject station when to reject bad cups.
The IC ThermoChecker was developed due to a client request to check for dimensional defects in a thermoformed part on a dry o?set printer, running at a rate of up to 600 parts per minute. Due to a variety of issues, traditional machine vision was found to be neither reliable nor e?ective because each inspection needed to be done in under 250 microseconds.
A 3D smart camera is at the heart of the inspection system
Partnering with its client, Industrial control developed a system using a 3D smart camera to reliably detect and reject the defective parts, resulting in a substantial increase in defect detection before parts left the client’s facility.
In the configuration used, the system is able to measure up to 130 distinct profiles per part over the course of 30ms, resulting in approximately 75,000 distinct profiles per minute with multiple tools and measurements for every pro- file. The camera itself is calibrated at the factory to real world values, allowing the user to set limits based on a measurement, rather than an arbitrary value, resulting in a system much more easily understood by operators and engineers alike.
The ThermoChecker kit comes complete with a control panel, touchscreen computer, mounting hardware, a stack light, an integrated plc, and an internet support appliance. The system does not require programing and can be used with any web browser on any device. Industrial Control has successfully installed this system in production facilities in the United States and Canada.
Industrial Control lists the following turn-key benefits of the ThermoChecker system:
- Reduce the risk of recalls and protect your company and customers.
- Save money with fully automatic inspection of every cup, no costly manual inspectors.
- See exactly how your machine is running and reduce setup time.
- Calibrate your machine faster with real data from our system.
- Shift counts for rejects onscreen or emailed/texted to your phone.
- Reduced regrind cost.
- Remote Internet support.
The company offers a free analysis of part samples with defects to determine feasibility. View the ThermoChecker in operation at www.industrialcontrol.com/thermochecker. For further information, telephone 616-931-1314.
Looking for a reprint of this article?
From high-res PDFs to custom plaques, order your copy today!


